Every fiberglass boat owner knows that scratches, nicks and gouges can mar the beauty of your vessel. Often these minor problems can be corrected with a little time and a few basic supplies.
 Fiberglass boat repair can feel intimidating to the uninitiated, but it’s quite simple if you follow the proper steps. It is important to use quality fiberglass boat repair products formulated specifically for the purpose and to have the proper tools. These will ensure that the repair is done properly and will last a long time. Please browse our selection of fiberglass boat products and get everything you need to tackle your next repair job!
Start by cleaning the damaged area with soap and water. Then sand the area and mix your resin and hardener according to application guidelines.
Scratches are the most common damage to fiberglass boats and can be caused by anything from branches on the riverbank to grocery carts in parking lots. Fortunately, light scratches don’t penetrate into the fiberglass core and can be repaired with some basic supplies.
Start by removing any wax or grease from the area with acetone. Then, wet sand the surface with 1000-grit wet/dry sandpaper, frequently re-wetting the sandpaper. Lightly sanding the damaged areas will rough them up and help the resin adhere.
Once the area is sanded to smoothness, you can apply a thin coat of gelcoat to the area. Use a spray can, and follow the application guidelines on the label. Before applying the gel coat, mask off the surrounding area and any items that you don’t want to get gelcoat on. This helps to prevent accidental sanding or painting of other areas.
If the scratch extends into the fiberglass core, you’ll need to repair the core and re-gelcoat the area. This can be a little tricky, and you’ll need to be sure that the scratch doesn’t affect the elevation of the area. For best results, use a fiberglass patch kit that matches the color of your boat.
Once the patch and new gelcoat are applied, you can sand the area again to smooth the finish and buff it to a shine with a good synthetic wax. You’ll need to do this a few times to get it looking like new. For more serious problems, such as spider web-like cracks or thermal fatigue cracks that run along the length of your hull, it’s a good idea to have a professional do the work.
No matter how careful you are with your fiberglass boat, botched landings or the occasional dropped pair of pliers can cause unsightly scratches and gouges in gelcoat. But the good news is that these are easier to repair than most boat owners believe. It’s a fairly simple matter to make your ship look as good as new with nothing more than some putty and fiberglass resin.
Start by washing the damaged area with a mild soap and water solution, then dry it thoroughly. Mask off any areas or items that you don’t want to get gelcoat on. Then use acetone to clean the damage and prepare it for gelcoat application.
Next, mix your gelcoat resin and hardener according to the manufacturer’s instructions. Thorough mixing is essential to a proper cure, so spend a full minute stirring. Then apply the gelcoat to the gouge using a putty knife. It’s important to spread it evenly so that it’s as smooth as possible. You have a 10- to 20-minute window before the gelcoat begins to harden, so work quickly.
If the gouge is deep enough, you’ll need to fill it with epoxy resin and filler to prevent structural fiberglass damage. If the gouge is in a textured surface like diamond nonskid or in a multitone finish, you’ll need to call in a pro for this type of repair. However, even this type of damage is generally easy to fix, compared to the delamination that can occur from deeper impact damage.
The last thing you want to see in your boat is a leak. It can be devastating to the integrity of your hull and can threaten the safety of those aboard. This is why it’s important to check your fiberglass hull for damage and conduct regular maintenance to prevent it from getting worse.
If you find a hole in your fiberglass, it’s important to take care of it right away to avoid further damage and keep your boat safe to use. To make a lasting repair, you’ll need the right materials and tools. A complete fiberglass repair kit can help you get the job done with all the epoxy, fiberglass and fillers you need to fix cracks and holes, gelcoat blisters and delaminated cored panels. Plus, detailed instructions show you how to properly make these repairs so they’re long-lasting.
Leaks in fiberglass are caused by impacts or cracks in the outer skin and can also happen when water seeps into the inner fiberglass structure through the wooden stringers or transom. If left untreated, these leaks can deteriorate the foam and cause it to rot. Water can also soak through the gel coat and into cracks and voids in the fiberglass, causing a loss of structural strength.
A quick and easy solution for an emergency leak is a waterproof epoxy sealant. This can be purchased at most marine stores and is a good option for a small leak in a hull fitting or through-hull. However, it’s not an effective solution for a major leak under the waterline that requires removing the boat from the water to carry out proper, long-term repair work. If you need a permanent solution, consider a fiberglass boat patch made of vinylester resin which is less sensitive to ambient moisture than epoxy and polyester.
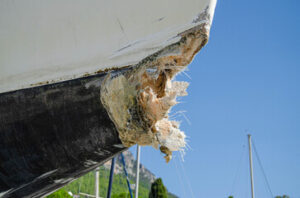
A delamination in fiberglass can be devastating to a boat. This occurs when the outer layers separate from the core. It can be caused by a number of factors, from poor fiberglass layup to impact forces to water migrating thru the gelcoat and reacting with the resin. It’s important to identify and repair this type of damage promptly. The first step is to sound the area with a hard mallet. Solid glass will give a crisp tone, while delaminated fiberglass will produce a muted dull sound. Once the area has been sounded it needs to be thoroughly dry before repairs can be made.
The next step is to remove the old damaged fiberglass and prep it for the new layers of glass. If the hole is large it is a good idea to grind out the area removing as much of the fractured fiberglass as possible. This will allow you to bevel the edge of the hole and then bond in new cloth from both sides. It is best to use epoxy rather than polyester for this repair due to the added strength.
Blisters are air-filled cavities on the bottom of fiberglass boats that can trap water. If not addressed promptly, they can grow in size until they burst or delaminate the entire hull surface. Blistering often occurs as a result of collision, improperly loading the boat, or prolonged exposure to the elements. But it can also be a symptom of inferior construction or materials.
A URI study found that most fiberglass hulls are vulnerable to blistering, regardless of the quality of their construction or the materials used. Blisters occur when water soluble chemicals in the resin or from other sources (such as dirt, sawdust, or algae) combine with water molecules in the hull laminate to produce a chemical reaction that results in bubbles.
To avoid the potential for re-blistering, the area must be clean and dry before beginning any repair. This may require opening a small hole in the affected area to allow the blister to drain, or grinding the affected surface to remove a thin layer of gelcoat. If you grind the affected area, use a 36-grit disk and wear eye protection; the pressure inside a hull blister is double that of a bottle of champagne, and the fluid that blasts out can contain acid.
After thoroughly cleaning and washing the affected area, you’ll want to replace the damaged gelcoat and the first layer or two of the underlying laminate. Avoid talc or other absorbent fillers; they’ll suck up the water and worsen the problem. Epoxy resin is preferred, although a vinylester will work just as well. You’ll also need some six to 10-ounce fiberglass cloth, cut into discs slightly larger than the depressions. A quart of acetone, a box of TSP, and a 36-grit sanding disk complete your supply list.